To set up a pro-grade home garage workshop, you need five things in the right order: a smart layout plan, proper tool storage, a solid workbench, reliable power, and good lighting. Most people get this backwards — they buy tools first and figure out storage later. This guide walks you through the right sequence so you build a garage you'll actually enjoy working in, not just a cluttered space with expensive tools buried under everything else.
Whether you're starting from an empty two-car garage or upgrading a space you've outgrown, the process is the same. Here's exactly how to do it.
Step 1: Plan Your Layout Before You Buy Anything
The biggest mistake in any garage setup is buying storage and workbenches before deciding where everything goes. Spend 30 minutes on layout first and you'll save hundreds of dollars and weeks of frustration.
Measure your space
Get the exact dimensions of your garage — width, depth, and ceiling height. Note where the doors are (car door swing radius, side entry door, any fire door), where the electrical panel is, and where existing outlets are located. Sketch it out on paper or use a free tool like RoomSketcher.
Define your zones
A well-organized garage workshop has distinct zones that keep different activities from interfering with each other:
- Vehicle zone: If you're parking a car, map out exactly how much floor space it needs — including door swing room on both sides. Everything else works around this.
- Tool storage zone: Rolling tool chests, wall organization, and modular storage systems. Typically along one or two walls.
- Work zone: Your workbench and the clear floor space in front of it. You need at least 4 feet of clear space in front of any bench to work comfortably.
- Power zone: Where your backup power station lives, where your compressor goes, and where your charging stations are located.
- Overhead zone: Ceiling storage for seasonal items, large bins, and anything that doesn't need daily access.
Plan for traffic flow
You should be able to walk from the entry door to your workbench without moving anything. If your layout requires shuffling items to access tools you use daily, redesign it before spending a dollar.
Step 2: Set Up Your Tool Storage First
Tool storage goes in before the workbench. Here's why: rolling tool chests and wall systems need to be positioned against walls before you establish your work zone. If you set up the bench first, you'll end up cramming storage wherever it fits rather than where it works best.
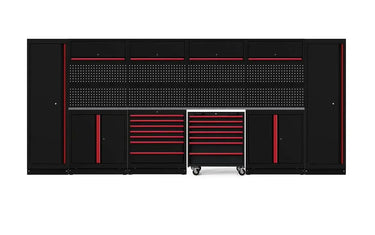
Rolling tool chest
Your rolling tool chest is the foundation of your garage workshop. It keeps your most-used tools organized, accessible, and protected. For a serious home workshop, look for a chest with at least 14 drawers, full-extension ball-bearing slides, and 18-gauge steel construction.
The BoxoUSA Tech Series is the top pick for home garage workshops — professional build quality at a price that makes sense for a personal garage. If you're building a full workshop with multiple stations, the OSM Pro Series modular system lets you configure a custom layout and expand over time.
Wall organization
Walls are prime real estate in a garage workshop. A good wall organization system handles everything that doesn't belong in a drawer — power tool holders, extension cords, hoses, levels, and frequently grabbed items like hammers and screwdrivers.
Wall-mounted pegboard, slatwall panels, or track systems all work well. The key is mounting them at the right height — tool holders should be between shoulder and hip height so you're not reaching overhead or bending down for things you grab constantly.
Ceiling storage
Ceiling-mounted overhead storage racks are the most underused square footage in most garages. Use them for seasonal items (holiday decorations, camping gear, snow equipment) and anything bulky that doesn't need frequent access. Keep the ceiling above your work zone clear — you'll thank yourself the first time you're carrying a long piece of lumber or a ladder.
Modular storage for serious build-outs
If you're doing a full garage makeover rather than just adding a tool chest, a modular storage system gives you a unified, professional look and far more flexibility than mixing random pieces. The OSM Pro Series at Garage Gear Direct is designed specifically for this — start with a base configuration and add modules as your needs grow.
Shop Garage Storage Makeover Collections →
Step 3: Choose and Position Your Workbench
Your workbench is your primary work surface — it needs to be solid, the right height, and positioned where you actually have room to work. A wobbly workbench or one that's too low will wear you out fast.
Workbench height
The right workbench height is typically 34–36 inches for most adults — about the same as a kitchen counter. If you're doing precision work like electronics or small engine repair, go slightly higher (36–38 inches) so you're not hunching. If you're doing heavy pounding or working with large assemblies, go slightly lower (32–34 inches) so you can put your body weight into the work.
Workbench surface
For a garage workshop, you want a surface that can take abuse — hardwood, thick plywood, or a steel top. Avoid MDF for a primary work surface; it swells and deteriorates with any moisture or oil exposure. A replaceable plywood top (3/4 inch minimum) is the most practical choice for most home workshops — when it gets beat up, you replace just the top, not the whole bench.
Workbench with built-in storage
The most efficient workshop layouts use workbenches with integrated storage underneath — drawers, cabinet doors, or open shelving. This eliminates the gap between your bench and the floor where tools, fasteners, and debris collect. Garage Gear Direct carries workbenches designed to pair with the OSM Pro Series system for a fully integrated look.
Step 4: Sort Out Power — Outlets, Compressor, and Backup
Power is the part most DIYers underestimate until they're running extension cords across the floor and tripping the breaker every time they run two tools at once.
Dedicated circuits
If you're serious about your workshop, have an electrician add dedicated 20-amp circuits to your garage. One for each major station — compressor, workbench, tool charging area. This prevents tripped breakers and protects your tools from voltage fluctuations when large draws kick on.
Air compressor placement
Your compressor should be positioned where the noise is manageable and the hose can reach your entire work zone. Most home workshop compressors work best in a corner with good airflow — they run hot and need ventilation. Keep it accessible for draining the tank, which you should do after every use to prevent rust.
Backup power
A garage workshop backup power setup means you keep working through outages — and protects sensitive equipment like battery chargers and electronics from power surges when the grid comes back on. A 2,000Wh+ portable power station handles most workshop essentials. For a fully equipped workshop with a compressor, you'll want 3,000Wh or more.
The Anker SOLIX and Nature's Generator Lithium 3600 are both strong choices for workshop backup power. Pair either with solar panels and you can keep working indefinitely even in extended outages.
Shop Backup Power for Your Workshop →
Step 5: Lighting and Safety Gear
Bad lighting is one of the most common reasons garage workshops are unpleasant to work in. If you're squinting to see what you're doing, you're working harder than you need to and making more mistakes.
Overhead lighting
LED shop lights are the standard for garage workshops — bright, energy efficient, and long-lasting. For a two-car garage workshop, plan for at least 5,000–8,000 lumens total. Position lights so they illuminate your workbench and tool storage areas without casting shadows where you work.
Task lighting
A dedicated work light at your bench fills in shadows that overhead lighting misses — especially when you're working on small parts or reading measurements. Magnetic work lights that attach to your tool chest are particularly useful.
Safety gear
A fully set-up workshop needs a few safety basics in accessible locations — not buried in a drawer:
- Fire extinguisher — mounted on the wall near the exit, not behind the car
- First aid kit — at workbench height, easy to grab with one hand
- Safety glasses — hanging near the workbench, not in a cabinet
- Hearing protection — next to the compressor or power tools
- Work gloves — multiple pairs, one at the bench and one near the vehicle zone
Complete Home Garage Workshop Checklist
| Category | What You Need | Priority |
| Layout | Measured floor plan with zones defined | Do first — free |
| Tool Storage | Rolling tool chest + wall organization | Essential |
| Workbench | Solid bench at correct height with storage | Essential |
| Power | Dedicated circuits + backup power station | Essential |
| Lighting | LED shop lights + task lighting at bench | Essential |
| Safety | Fire extinguisher, first aid, PPE | Essential |
| Ceiling Storage | Overhead racks for seasonal/bulky items | Recommended |
| Modular System | OSM Pro Series for full build-outs | For serious builds |
Building a pro-grade home garage workshop is one of the best investments a serious DIYer or mechanic can make. Done right, it pays back every time you work in it — faster project completion, less time hunting for tools, and a space you're genuinely proud of.
Garage Gear Direct specializes in exactly this kind of build. Every product in the catalog is handpicked for durability and real-world workshop use, organized by project so you can build your setup with a plan. The team is available at (970) 699-4343 if you want help speccing out a specific space.
Shop the Home Workshop Setup Collection →
Frequently Asked Questions
How much does it cost to set up a home garage workshop?
A basic but solid home garage workshop — rolling tool chest, workbench, wall organization, and lighting — typically runs $1,500 to $4,000. A full professional build-out with a modular storage system, premium workbench, backup power, and complete tool set can run $8,000 to $20,000 or more depending on the size of the space and scope of the build.
What should I buy first when setting up a garage workshop?
Plan your layout first — it costs nothing and prevents expensive mistakes. Then buy your tool storage (rolling chest and wall organization) before your workbench, so storage positions are established before you set your work zone.
How much space do I need for a home garage workshop?
A one-car garage (approximately 12x20 feet) is workable for a basic workshop. A two-car garage (20x20 feet or larger) gives you room for a dedicated work zone, vehicle storage, and full tool organization without feeling cramped. The key is layout — a well-planned smaller space outperforms a cluttered larger one.
What is the best workbench height for a garage workshop?
For most adults, 34 to 36 inches is the ideal workbench height — similar to a kitchen counter. Go slightly higher for precision work, slightly lower for heavy-duty tasks where you need to apply body weight.
Do I need backup power in my garage workshop?
If you rely on your workshop for projects, automotive work, or anything time-sensitive, yes. A 2,000Wh to 3,600Wh portable power station keeps your essential tools, lighting, and battery chargers running through outages. It also protects sensitive electronics from power surges when the grid restores.